Tuesday, April 30, 2013

Convert Word Files into PDF with the most simple and free Word to PDF converter

Hi Guys
We all have our documents that needs to be in a professional format that is non editable.
Your CV for example will look more professional if you saved it as PDF
many other Books or papers are published as PDFs for copy rights protection
So You will love to try this small tool that adds an option in your microsoft word to save the document as PDF.
Just install it and you will find another option called (save as PDF) in the file menu of office 2007
or you will selecy PDF in the save as dialog box of office 2010 as shown in picture

Download

Monday, April 29, 2013

Remove the annoying Page separator Line from Microsoft Office Word


There is a line in my document that I can't delete because I can't select it. How did it get there, and what can I do about it?
do you feel that ?

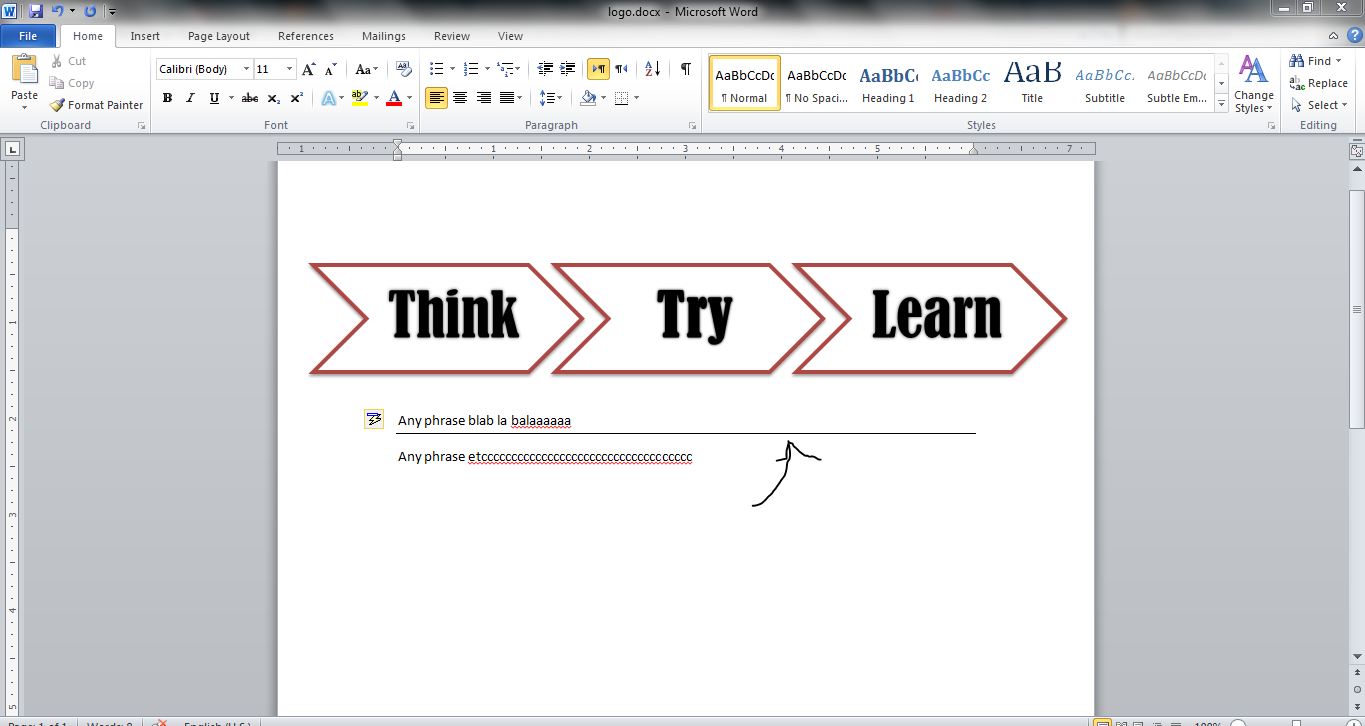
It is very annoying that line separator.
but also easy to remove when you read the following steps:


To remove this “line,” select the paragraph above it and remove all the borders from it as follows:

In Word 2003 and earlier, go to the Format | Borders and Shading dialog, and click the preset picture for “None.” Alternatively, click the down arrow beside the Borders button on the Formatting or Tables and Borders tool bar and choose the last (No Border) option in the palette.


In Word 2007, on the Home tab, locate the Paragraph group. The bottom right button is the Borders button; click the arrow beside it and select No Border.


In any version, you can simply click in the offending paragraph and press Ctrl+Q, which resets the paragraph formatting to the default for the style (which doesn't include borders). This, however, will remove any other direct paragraph formatting as well as the border.

Note: If you've pressed Enter several times trying to get rid of the line, you will merely have applied the border formatting to all the paragraphs you added, as well as to the original one. This won't be obvious, because when several consecutive paragraphs have the same “Bottom Border” formatting applied to them, the border only appears below the last of them (Word takes “bottom” literally). So If you then remove the border formatting from the paragraph that has the line below it, the line will move up one paragraph. The trick is to select all the affected paragraphs and either press Ctrl+Q or choose No Border.

To prevent this from happening again, you need to disable “Automatic borders.”


In Word 2003 and earlier, go to Tools | Auto Correct Options | Auto Format As You Type and clear the check box for “Borders” or “Border lines” under “Apply as you type.”


In Word 2007, Office Button | Word Options | Proofing | Auto Correct Options | Auto Format As You Type and clear the check box for “Border lines” under “Apply as you type.”

It is a good idea to turn off most of the options on the “Auto Format” and “Auto Format As You Type” tabs of Auto Correct Options. For more details, see http://word.mvps.org/FAQs/Formatting/TameAutoFormat.htm

Tuesday, April 23, 2013

Solve the LapTop fan high noise problem. Solved !!

Hi Guys
Are you an HP Pavilion Owner?? or any other LapTop models that is considered as "noisy" machines??
when you buy a new laptop, you will pay attention to all the technical specs and may be the good looking.
but very few of us will care about the fan noise.
you will be happy with your laptop and stand the noise for the first weeks, may be a couple of months, but after that you will give up and say :
"I am Loosing my temper because the fan is very noisy and always ON".

Here is the solution for you.
It is easy and simple, but effective.

Follow the following steps:

1- open control panel and select "Hardware and Sound"
2- select "Power Options"
3- you will see all your power plans listed, the currently used plan is marked with a radio button to the left.
4- for your currently used plan select "change plan settings"
5- Down you will see "Change Advanced plan settings"

6- slip the bar till you find "processor power management" and expand that
7- select "System cooling policy" and expand it
8- you will find 2 cases to change: one is On battery, one is Plugged in
if you need to reduce the fan speed and noise, select the both options as PASSIVE
that will make the computer depends on the outside environment for cooling more than the fan.
that shall be not dangerous as the laptop is designed to auto shutdown if the temperature exceeded a critical limit
but you have to do that on your personal risk and responsibility :)

Are you Facing Slow Performance of your Windows 7, Try this out: Sloution to improve Windows 7 performance Speed

Hi Guys,

Today I m Going to Offer you a new solution for improving your LapTop, PC that runs WIN-7.
Some times you find that the Operating System is too slow, and you are not ready to restart.
or it is always slow and you are still out of hardware upgrading budget.

Try this out, It will improve the performance with a good percentage:


1- Open Control Panel From Start Menu
2- Select "System and Security"
3- Select "System"
4- at the left hand panel, click on "Advanced System Settings"
5- a new window will show up, select "Advanced" Tab
6- in the first Box named "Performance, click on "Settings"
7- select from the options "Adjust for best performance"


And your are done, You will see that your computer will take seconds to load and the apperance settings will be reduced to very basic appearance settings that consumes low memory and processing.
You will lose some graphic animations and earn better performnce :)

Monday, April 22, 2013

How to Keep your History Clean?? automatically clean your web browsing and file browsing Histories on your computer

Hi All,

Are you using a shared PC or laptop?
Are you suffering from sticky people that used to borrow your laptop:).
Are you keen to be untraceable in case of sudden inspection?

Those Instructions will help:

In Internet Explorer:
1 Launch Internet Explorer.
2 Click the "Tools" menu at the top of the window and select "Internet Options.
3 Look under "Browsing History" on the "General" tab, and you'll see a box next to the words "Delete              browsing history on exit." If this box does not have a check in it, click the box to place one there.
4 Click the "Apply" button. Explorer will now purge the history every time the window is closed.


In Firefox
1 Launch Firefox.
2 Click the "Tools" menu at the top of the window; then select "Options."
3 Click the "Privacy" tab; then look at the bottom of the tab for a box next to the words "Always clear my         private data when I close Firefox." If there is not a check mark in this box, click it to place one there.
4 Close the Options window.


In Safari
1 Launch Safari.
2 Click the "Safari" menu at the top-left corner of the screen and select "Preferences."
3 In the "General" tab, click the drop-down menu next to the words "Clear history" and select the interval at       which you would like the browsing history to be automatically deleted.
4 Close the Preferences window.

That makes your INTERNET browsing clean!!

Now about your files browsing??
1 Right click on the task bar
2 select Properties
3 click on "start menu" tab
4 in the Privacy Box: un-check the box beside "store and display recently opened items ...."
And Enjoy Being UN traceable :)

Monday, April 1, 2013

تعديل خيارات الترجمة العربية أصلاح تشغيل الترجمة العربية فى برنامج GOM Player

هل تستخدمون برنامج
 GOM Player
 لتشغيل ملفات الفيديو و الافلام؟؟


هلى تعرضتم لمشكلة ان هذا البرنامج يعرض الترجمة للغة العربية معكوسة؟
تعالوا معا نقرأ الحل لهذه المشكلة البسيطة
 
أولا لا بد من تنزيل احدث نسخة من برنامج
GOM Player
من هنا
 
ثم بعد تنزيل البرنامج و اكمال تثبيته على جهاز الكمبيوتر
نفتح البرنامج من الايقونة على سطح المكتب
و نضغط F5
ستظهر لنا شاشة الخيارات و التفضيلات
نضغط من اليسار على زر
Subtitles
لتظهر لنا خيارات الترجمة على اليمين
بالنظر للاعلى نجد مجموعه من الصفحات Tabs
نختار آخر Tab
و اسمها :  Others
و نعلم على المربع المكتوب بجانبه
"RTL Language Support[Beta]"
و نضغط
CLOSE
 
و مبروك عليكم تشغيل الترجمة العربية بترتيب الكلامات الصحيح الغير معكوس